About Me

I have been cooking my way through life for over 50 years, beginning with mud pies as a child. I've turned a corner now and feel a Renaissance in my life. Recipes and Random Thoughts is my personal spin in a blog about how to prepare good food and how it prepares you for life. I want to share with you, honest to goodness food punctuated with perspective from the special memories and moments that have marked my journey.

Sunday, October 19, 2014

Tips for Caramel Confidence

dry method with butter & cream
Caramel is sugar cooked to a temperature where it breaks down to its components glucose and fructose and then dairy ingredients added, most often, cream and butter, then flavorings (vanilla and salt).  Cooked sugar can take the form of brittle, icing, sauce, or candy, to name the most familiar. I've already published a caramel sauce recipe(Sept. 15 2014-Apple Walnut Cake with Caramel Sauce) and frankly, any form of caramel takes practice, so these are some tips that will give you confidence when cooking sugar.  I usually get it right 99% of the time but there's that occasional moment  of distraction or something in the chemistry  that turns my favorite dessert sauce to a burned, lumpy nasty mess in a second.  There are some basics of cooked sugar that should lessen your chance of disaster when attempting a caramel of any style.  No matter how you make your caramel, it will add a fabulous complexity of flavor to any dish.

There a two methods for making caramel: wet and dry.  The dry method is simply heating sugar in a dry pan until the sugar liquefies and browns.  This requires careful attention to heat and color without a candy thermometer.  Use a wide surface heavy fry pan for this method so the sugar is distributed in a thin even layer. This encourages more even browning.  The technique for moving the melting sugar may be swirling the fry pan and never stirring or stirring the sugar a little in the beginning to get the flow going but after that point a stirring device will cause crystallization to form around the spoon so swirling is desirable as soon as the sugar starts to liquefy. Add, butter, cream and flavoring (salt & vanilla) once the sugar liquefies and you have a caramel sauce.  The finished, cooled sauce should be smooth and thick enough to fall in a ribbon from a spoon.  It will thicken more as it cools.

perfect dry method caramel sauce
The wet method adds a little water to sugar,  then boils the mixture to a certain temperature.  Using a heavy, wide sauce pan you must always be on guard to keep any crystals from forming on the side of the pan because it can cause a chain reaction and turn the clear syrup to opaque and grainy.  The wet method is a little more forgiving as the water slows the heating and there are various techniques to avoiding crystallization. Washing down the sides of the pan with a damp pastry brush or covering the pot with a lid to trap steam will dissolve those crystals.  Don't stir the syrup until it starts to show color.  This is an indication 80% of the water has evaporated.  Use a candy thermometer for accuracy and keep a bowl of cold water handy to cool the temperature down when you see the right color.  Submerge the bottom of the pan for a quick cooling method.

wet method cooking with a thermometer

Know what temperature you need.  Caramelization begins around 320 degrees when the sugar melts.  At 340-350 degrees, the color progresses to medium brown and, when cooled, will still be hard but not brittle.  At 365-380 the caramel is dark brown and will cool to a softer texture.  This is where to add cream and butter, etc. to make sauces or candy.  Anything above 410 degrees is "black caramel"  typically only used by professional bakers.

I prefer the dry method for sauces and in making caramel. For this post both techniques did develop a few lump which I just strained out with a gravy stainer.  Lowering the temperature will usually help them dissolve. Any recipe could dictate which method you need but it is the dedicated home cook who can master both, so give both some effort.  Your friends and family will be impressed.

Beware of molten sugar.  It's hotter than boiling water and can adhere to the skin and cause serious burns!!  Don't taste until it cools.

Tuesday, October 14, 2014

The Table Favor

It's nice to add a table favor for a special occasion meal. We always had a table favor for Christmas Eve dinner.  It was usually personalized with your initials and someone had gone to a good bit of trouble to make it.  My favorite, will always be the red blinking Rudolf nose we all unwrapped with dessert.  It seemed to suit the festive atmosphere after too many toasts.  Our friends wore them as they drove home that night and got quite a few stares when they stopped for a red light.  As children, birthday parties were notorious for goodie bags and favors. Sometimes, I thought it was the only reason to accept an invitation and the contents of the goodie bag were dumped out immediately when you got in your parents' car and examined and rated. It only seemed fair to me, that if I was to grace a party with my presence and bring a wrapped gift, I should receive something for the trouble.  Brat!

I used to do a lot of very clever decorated cookies, thanks to the inspiration of Martha Stewart.  I sold quite a few as a "little something" at Valentines or a stocking stuffer at Christmas.  Wrapped in little cellophane bags and cinched with a bit of raphia, they where a hit.  I've long since retired from that labor intensive endeavor but recently had a request from an old friend for a bridesmaids luncheon table favor.  I only do these for special people when I'm in the mood and this was one of those occasions.  Designer wedding cookies have become soooooo elaborate but I found just the thing using a heart shaped cutter and just white icing.  Each is an individual styled gown bodice.  They are cute and the MOB (mother of the bride) gave that squeal of delight that let me know I'd hit the mark.

I'm looking forward to resuming decorated cookies for my grandchildren and anyone else deserving.  They are definitely a labor of love and quite gratifying.  A pot roast or souflee is easier.  A sabayon is elegant and sushi takes skill but nothing satisfies my culinary ego like a pretty decorated cookie.

Sunday, October 5, 2014

Butternut Squash Risotto with Baby Leeks

It always pays to have a well stocked pantry and freezer. I'm usually in the kitchen early enough to give dinner thorough consideration and my complete attention, but not today.  I had no plan and got home later than usual but with my first butternut squash of the season and some baby leeks I could whip up one of my favorite comfort meals - butternut squash risotto.  I've never seen "baby" leeks before so I had to grab them, but regular leeks or 1 cup of diced onion works just as well. I always have olive oil and wine on hand so keeping Arborio rice, Pancetta, Parmesan, fresh thyme and homemade chicken stock readily available insured a delicious and cozy evening meal  for two with just a quick stop at the grocery for the fresh vegetables.

Risotto doesn't have a reputation as an efficient meal but it can be done in about 45 minutes if you use the narrow end of a larger butternut squash and save the bulb end for later (skipping the scooping of the seeds).  Use a vegetable peeler and a sharp knife to make short work of the prep.  The baby size leeks were quick to slice and chop (remember the folds of the leek must be thoroughly washed for sand but this baby size had none).  I thawed the stock in the microwave and warmed it in a separate sauce pan until ready to use but store bought is fine.  I had already grated a good bit of a chunk of Parmesan and had it ready in a zip lock bag.  Now this is NOT a Rachel Ray 30 minute meal or a Ree Drummond 16 minute meal.  Adding the chicken stock in 1 ladle at a time does take a bit of patience, so have a glass of wine and unwind.  If you want to prepare this in advance, incorporate 2 cups of the stock, cover and then finish the remaining stock just before serving.  It takes 3-5 minutes to incorporate each addition of stock.


1 tbls olive oil
2 oz diced Pancetta
1 tbls butter and more as necessary
2 cups diced butternut squash (1/2 inch cubes)
1 cup white part leek sliced to 1/4 inch (or substitute,1 cup diced onion)
1 tsp chopped fresh thyme (or substitute 1/2 tsp dried thyme)
1 1/2 cups Arborio rice
1 cup dry white wine
4 cups chicken stock
1 cup grated Parmesan cheese
salt & pepper

In a large fry pan, heat the oil and add the Pancetta over medium heat.  Cook Pancetta until fat is rendered and meat has just turned brown.  Remove Pancetta and drain on paper toweling.  Pour off all but 1 tbls fat.  Reduce the heat and add the butter and butternut squash and saute' until slightly browned, then add the sliced leeks and thyme and cook another minute or two. Season the vegetables with salt and pepper. Remove vegetables and set aside.  Add more butter and the rice and cook stirring until the grains look milky white.  Deglaze the pan with white wine. Stirring up and loosen all brown bits.  When the wine is almost absorbed, add chicken stock 1 ladle at a time, stirring constantly.  Add the next ladle as the liquid is absorbed after each addition.  When all the liquid is added, return the Pancetta, vegetables and the Parmesan and combine.  Add a little water if necessary.  Adjust the seasoning. The rice should be creamy.

Monday, September 22, 2014

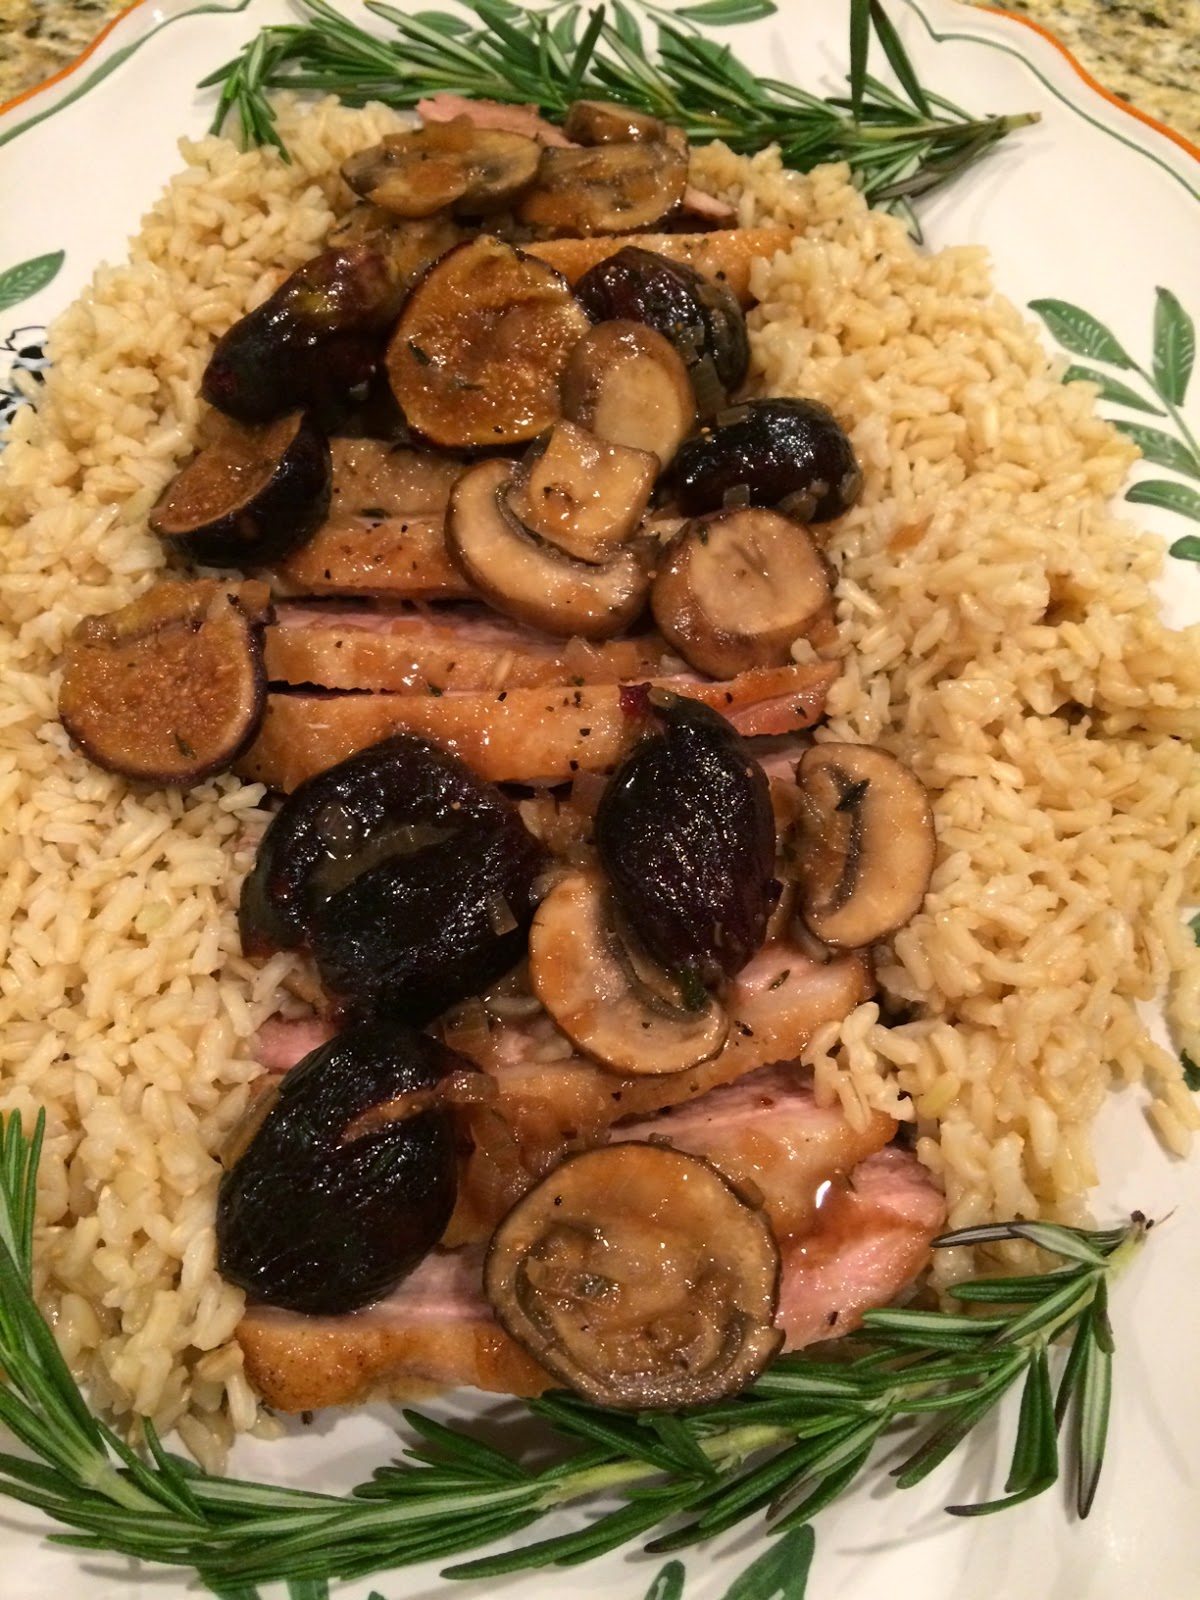
Autumnal Equinox Dinner - Duck Marsala

Autum official begins at 10:29 p.m. and right on cue, the weather changed today.  It's cooled down to the 70's, the humidity is lower and the sky is clear and bright blue. I always hate to see summer end but there's something thrilling about that first hint that fall is on the way.  So I have to mark the occasion with a special meal and I feel like duck is the appropriate focus and ramps up traditional chicken marsala. It reminds me of my father and grandfather hunting and bringing home duck for dinner when I was a child.  They'd laugh and say, "Let's have duck dinner, we brought the duck."  Individually packaged duck breast is available in many grocery stores or on line as is duck fat.  You don't have to go hunting.

4 duck breast, rinsed under cool water and patted dry
1 tbls spoon duck fat or 1 tbls olive oil
1 large shallot, chopped fine
4 oz. sliced baby bella mushrooms
8-10 fresh figs, stem removed and halved lengthwise
1/2 dry marsala wine
1/2 cup chicken stock
1/2 tsp chopped fresh thyme or 1/4 tsp dried
salt & pepper
1 tbls unsalted butter
fresh chopped parsley for garnish

Preheat oven to 350 degrees

Season the duck breast liberally with salt and pepper
Add the duck fat and olive oil to a large skillet and heat over medium high heat.
Add the duck breasts skin side down and allow to brown 5-7 minutes. Adjust heat if necessary.
Turn over and brown 5 more minutes.
Place in preheat oven for 7 minutes. Duck skin should be brown and crisp.
Remove from oven and move duck to a plate and tent with foil.
Pour off all but 2 tbls fat. Remember the handle is hot.
Add the shallot, mushrooms and thyme and saute' for 3 minutes until shallot softens
Add the wine and chicken stock.  Deglaze the pan and heat just to a boil then reduce heat and cook down until reduced by half.
Add the figs and cook for another minute.
Swirl in the butter.
Pour the reduced sauce over sliced duck, garnish and serve immediately.

Backyard Tailgate, Brats & Beer

My son got bitten by the craft beer brewing bug some years ago. I guess there's something in his genes that urges him to cook. It all began when he was in Australia for a college semester and came home with a brew kit.  Now, he's gotten more sophisticated and his garage is an elaborate home brew stage.  His wife makes up cute lables on her computer and it's all great fun.  When he gets together with buddies to watch football, he brings a cooler of his latest and they critique the beer and teams.
New Country Cozy Blond

 So what goes with cold beer and football?  How about some brats steamed in beer and finished off on the grill, then topped with grilled onions and peppers on a buttered and toasted bun. Good times for all!

Put 5 or 6 bratwurst in a single layer in a dutch oven or a deep fry pan with a lid. Add one bottle of beer and two tbls whole grain mustard.  Heat covered until the beer just starts to boil then cut the heat and let the brats steam for about 15 minutes until no pink is visible.

Prepare a charcoal fire or a gas grill.  Slice 2 large onions and 2 green peppers, cored and seeded and sliced into thin strips, and toss in a neutral oil to coat.  Add peppers and onions to a grill basket over indirect heat. Grill until lightly browned.  Finish the steamed brats on the grill until nicely browned. About 5 minutes.  Split hoagey rolls and butter the inside and place on the grill for just a minute to toast.  Assemble and serve with German mustard if desired and with a nice cold beer.

Wednesday, September 17, 2014

Kale Pesto Change-o

I admit I've haven't had enough enthusiasm for the latest super food, kale.  It's nutritional qualities are outstanding but I've been a slacker putting it on my grocery list. I'd rather have it in a restaurant or salad bar. It stinks when you cook it and I hate for my kitchen to smell bad. It has that sulphury quality when cooked that I associate with certain bitter greens that need prolonged cooking.  It's leaves are tough and fibrous versus the more tender turnip or chard variety that I prefer.  Kale salads are tasty enough but they need a lot of makeup ingredients to balance kale's slight bitterness and dense texture.  So I solved those issues by making kale pesto. It's my answer to work this nutritious green into my diet more often. The kale is blanched, then chopped finely in a food processor with traditional pesto ingredients.  It's quite tasty on pasta and slathered inside a sandwich.  I even used it to garnish tonight's dinner of roasted salmon over Provencal ratatouille.  I don't won't to miss out on nutrition so, "pesto" change-o.  Kale transforms from a tough bitter green to a bright green more sophisticated form with  multiple uses.

  • 1 bunch of kale, stem removed; leaf part only by running the tip of your knife up either side of the stim until it ends.  Then chop across into 2 inch ribbons.  You should have 3 ozs of kale leaves.
  • 3 peeled garlic cloves
  • 1/2 cup Parmesan
  • 1/2 cup toasted pin nuts (optional)
  • 3/4 cup good olive oil such as Oli & Ve Picual
In a large pot, bring 2 quarts of water and 2 tbls Kosher salt to a boil.  Prepare a bowl of ice water and set aside. Add the chopped kale leaves to the boiling water and return to a boil.  Cook for one  minute. Drain the kale into a strainer or remove from the hot water with a strainer and plunge the wilted kale into the ice water bath immediately to stop the cooking.  Drain thoroughly after a few minutes in the ice water bath and wrap the kale in a clean linen or cotton dish cloth.  Dry the kale as much as possible until the kale is moist but no excess water exists.
 
Put the kale and garlic in a food processor and pulse 6-8 times.  Add the Parmesan and pine nuts, if using.  With the processor on, add 3/4 cup olive oil through the feed tube. Add process just until the oil runs through, about 1 minute.

Makes about 1 1/2 cup.  Store refrigerated with a little extra olive oil on top to inhibit oxidation.

Monday, September 15, 2014

"3 G" Spread: Green Olive, Goat Cheese and Green Onion

I found some wonderful green olives in a gourmet foods store this weekend and added them to cocktail nibbles before dinner that night.  I forgot to ask the name of the variety, but they were bright green in color, lovely in flavor and less briny than say, Kalamata.  I could have gobbled them all up.  My research came up with Castelvetrano olive but they are easy to pick out because of their color. The left overs where too good to waste so I put them together in a food processor with goat cheese and green onions.  This turned into a new favorite! I think I'm going to try it stuffed in a chicken breast.

1 cup Castelvetrano Olives
4 oz. goat cheese, at room temp
2-3 green onions, white and green parts, sliced thin
Fresh cracked pepper

Put the olives in the processor and pulse until they are a roughly chopped. Add the goat cheese and green onions and process just until combined and leaving texture to the spread.  Finish with a little cracked pepper when served.  Enjoy on crackers or as a stuffing to a chicken breast.